# Switch Expressions, Records, and Other Features
A key attribute of Java has been its ability to adapt to the increasing demands of the modern computing environment. Over the years, Java has incorporated many new features, each responding to changes in the computing environment or to innovations in computer language design. This ongoing process has enabled Java to remain one of the world’s most important and popular computer languages. As explained earlier, this book has been updated for JDK 21, which is a long-term support (LTS) version of Java. JDK 21 and its LTS predecessor JDK 17 have added a number of features to the Java language since the previous LTS version, JDK 11. A few of the smaller additions have been described in the preceding chapters. In this chapter, several major additions are examined. They are
Records
Patterns in instanceof
Enhancements to switch
Text blocks
Sealed classes and interfaces
Here is a brief description of each. Supported by the new keyword record, records enable you to create a class that is specifically designed to hold a group of values. A second form of instanceof has been added that uses a type pattern. With this form, you can specify a variable that receives an instance of the type being tested if instanceof succeeds. The switch has been enhanced in a number of ways, the most impacting of which is the switch expression. A switch expression enables a switch to produce a value. Text blocks allow a string literal to occupy more than a single line. It is now possible to specify a sealed class or interface. A sealed class can be inherited by only explicitly specified subclasses. A sealed interface can be implemented by only explicitly specified classes or extended by only explicitly specified interfaces. Thus, sealing a class or interface gives you fine-grained control over its inheritance and implementation.
# Records
Beginning with JDK 16, Java supports a special-purpose class called a record. A record is designed to provide an efficient, easy-to-use way to hold a group of values. For example, you might use a record to hold a set of coordinates; bank account numbers and balances; the length, width, and height of a shipping container; and so on. Because it holds a group of values, a record is commonly referred to as an aggregate type. However, the record is more than simply a means of grouping data, because records also have some of the capabilities of a class. In addition, a record has unique features that simplify its declaration and streamline access to its values. As a result, records make it much easier to work with groups of data. Records are supported by the new context-sensitive keyword record.
One of the central motivations for records is the reduction of the effort required to create a class whose primary purpose is to organize two or more values into a single unit. Although it has always been possible to use class for this purpose, doing so can entail writing a number of lines of code for constructors, getter methods, and possibly (depending on use) overriding one or more of the methods inherited from Object. As you will see, by creating a data aggregate by using record, these elements are handled automatically for you, greatly simplifying your code. Another reason for the addition of records is to enable a program to clearly indicate that the intended purpose of a class is to hold a grouping of data, rather than act as a full-featured class. Because of these advantages, records are a much welcomed addition to Java.
# Record Basics
As stated, a record is a narrowly focused, specialized class. It is declared by use of the record context-sensitive keyword. As such, record is a keyword only in the context of a record declaration. Otherwise, it is treated as a user-defined identifier with no special meaning. Thus, the addition of record does not impact or break existing code.
The general form of a basic record declaration is shown here:

As the general form shows, a record declaration has significant differences from a class declaration. First, notice that the record name is immediately followed by a comma-separated list of parameter declarations called a component list. This list defines the data that the record will hold. Second, notice that the body is optional. This is made possible because the compiler will automatically provide the elements necessary to store the data; construct a record; create getter methods to access the data; and override toString(), equals(), and hashCode() inherited from Object. As a result, for many uses of a record, no body is required because the record declaration itself fully defines the record.
Here is an example of a simple record declaration:
record Employee(String name, int idNum) {}
Here, the record name is Employee and it has two components: the string name and the integer idNum. It specifies no statements in its body, so its body is empty. As the names imply, such a record could be used to store the name and ID number of an employee.
Given the Employee declaration just shown, a number of elements are automatically created. First, private final fields for name and idNum are declared as type String and int, respectively. Second, public read-only accessor methods (getter methods) that have the same names and types as the record components name and idNum are provided. Therefore, these getter methods are called name() and idNum(). In general, each record component will have a corresponding private final field and a read-only public getter method automatically created by the compiler.
Another element created automatically by the compiler will be the record’s canonical constructor. This constructor has a parameter list that contains the same elements, in the same order, as the component list in the record declaration. The values passed to the constructor are automatically assigned to the corresponding fields in the record. In a record, the canonical constructor takes the place of the default constructor used by a class.
A record is instantiated by use of new, just the way you create an instance of a class. For example, this creates a new Employee object, with the name "Doe, John" and ID number 1047:
Employee emp = new Employee("Doe, John", 1047);
After this declaration executes, the private fields name and idNum for emp will contain the values "Doe, John" and 1047, respectively. Therefore, you can use the following statement to display the information associated with emp:

The resulting output is shown here:
The employee ID for Doe, John is 1047
A key point about a record is that its data is held in private final fields and only getter methods are provided. Thus, the data that a record holds is immutable. In other words, once you construct a record, its contents cannot be changed. However, if a record holds a reference to some object, you can make a change to that object, but you cannot change to what object the reference in the record refers. Thus, in Java terms, records are said to be shallowly immutable.
The following program puts the preceding discussion into action. Records are often used as elements in a list. For example, a business might maintain a list of Employee records to store an employee’s name along with his or her corresponding ID number. The following program shows a simple example of such usage. It creates a small array of Employee records. It then cycles through the array, displaying the contents of each record.

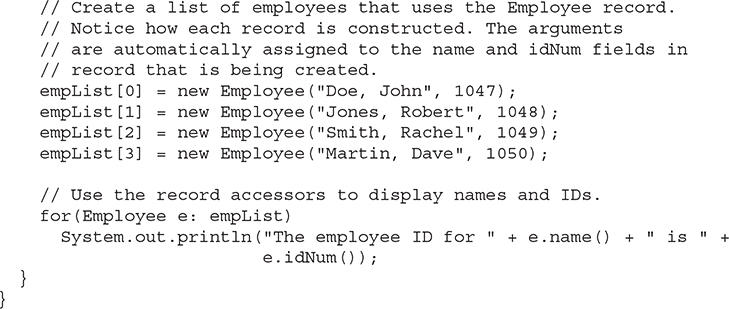
The output is shown here:

Before continuing, it is important to mention some key points related to records. First, a record cannot inherit another class. However, all records implicitly inherit java.lang.Record, which specifies abstract overrides of the equals(), hashCode(), and toString() methods declared by Object. Implicit implementations of these methods are automatically created, based on the record declaration. A record type cannot be extended. Thus, all record declarations are considered final. Although a record cannot extend another class, it can implement one or more interfaces. With the exception of equals, you cannot use the names of methods defined by Object as names for a record’s components. Aside from the fields associated with a record’s components, any other fields must be static. Finally, a record can be generic.
# Create Record Constructors
Although you will often find that the automatically supplied canonical constructor is precisely what you want, you can also declare one or more of your own constructors. You can also define your own implementation of the canonical constructor. You might want to declare a record constructor for a number of reasons. For example, the constructor could check that a value is within a required range, verify that a value is in the proper format, ensure that an object implements optional functionality, or confirm that an argument is not null. For a record, there are two general types of constructors that you can explicitly create: canonical and non-canonical, and there are some differences between the two. The creation of each type is examined here, beginning with defining your own implementation of the canonical constructor.
# Declare a Canonical Constructor
Although the canonical constructor has a specific, predefined form, there are two ways that you can code your own implementation. First, you can explicitly declare the full form of the canonical constructor. Second, you can use what is called a compact record constructor. Each approach is examined here, beginning with the full form.
To define your own implementation of a canonical constructor, simply do so as you would with any other constructor, specifying the record’s name and its parameter list. It is important to emphasize that for the canonical constructor, the types and parameter names must be the same as those specified by the record declaration. This is because the parameter names are linked to the automatically created fields and accessor methods defined by the record declaration. Thus, they must agree in both type and name. Furthermore, each component must be fully initialized upon completion of the constructor. The following restrictions also apply: the constructor must be at least as accessible as its record declaration Thus, if the access modifier for the record is public, the constructor must also be specified public. A constructor cannot be generic, and it cannot include a throws clause (though it is permitted to throw an unchecked exception at run time). It also cannot invoke another constructor defined for the record.
Here is an example of the Employee record that explicitly defines the canonical constructor. It uses this constructor to remove any leading or trailing whitespace from a name. This ensures that names are stored in a consistent manner.

In the constructor, leading and/or trailing whitespace is removed by a call to trim(). Defined by the String class, trim() deletes all leading and trailing whitespace from a string and returns the result. (If there are no leading or trailing spaces, the original string is returned unaltered.) The resulting string is assigned to the field this.name. Thus, no Employee record name will contain leading or trailing spaces. Next, the value of idNum is assigned to this.idNum. Because the identifiers name and idNum are the same for both fields corresponding to the Employee components and for the names used by the canonical constructor’s parameters, the field names must be qualified by this.
Although there is certainly nothing wrong with creating a canonical constructor as just shown, there is often an easier way: through the use of a compact constructor. A compact record constructor is declared by specifying the name of the record, but without parameters. The compact constructor implicitly has parameters that are the same as the record’s components, and its components are automatically assigned the values of the arguments passed to the constructor. Within the compact constructor you can, however, alter one or more of the arguments prior to their value being assigned to the record.
The following example converts the previous canonical constructor into its compact form:

Here, the result of trim() is called on the name parameter (which is implicitly declared by the compact constructor) and the result is assigned back to the name parameter. At the end of the compact constructor, the value of name is automatically assigned to its corresponding field. The value of the implicit idNum parameter is also assigned to its corresponding field at the end of the constructor. Because the parameters are implicitly assigned to their corresponding fields when the constructor ends, there is no need to initialize the fields explicitly. Moreover, it would not be legal to do so.
Here is a reworked version of the previous program that demonstrates the compact canonical constructor:
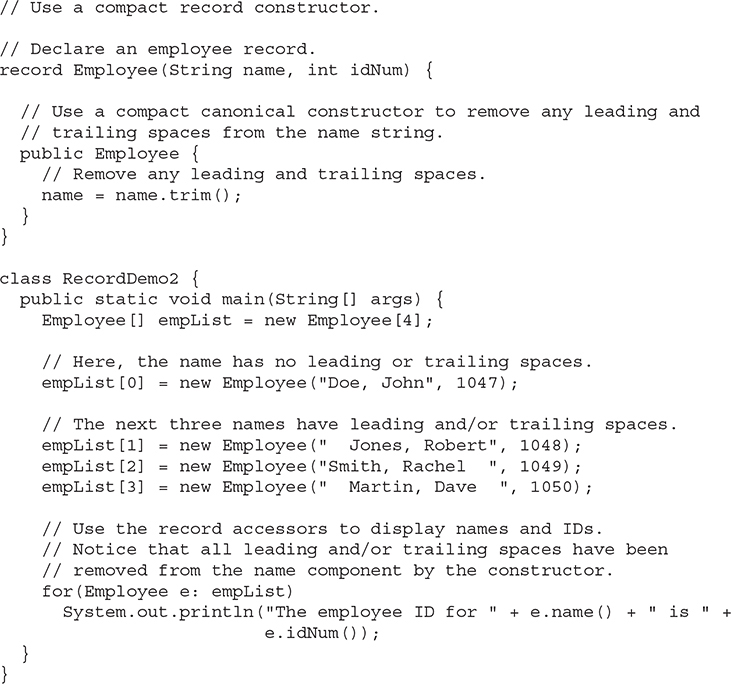
The output is shown here:

As you can see, the names have been standardized with leading and trailing spaces removed. To prove to yourself that the call to trim() is necessary to achieve this result, simply remove the compact constructor, recompile, and run the program. The leading and trailing spaces will still be in the names.
# Declare a Non-canonical Constructor
Although the canonical constructor will often be sufficient, you can declare other constructors. The key requirement is that any non-canonical constructor must first call another constructor in the record via this. The constructor invoked will often be the canonical constructor. Doing this ultimately ensures that all fields are assigned. Declaring a non-canonical constructor enables you to create special-case records. For example, you might use such a constructor to create a record in which one or more of the components is given a default placeholder value.
The following program declares a non-canonical constructor for Employee that initializes the name to a known value, but gives the idNum field the special value pendingID (which is –1) to indicate an ID value is not available when the record is created:
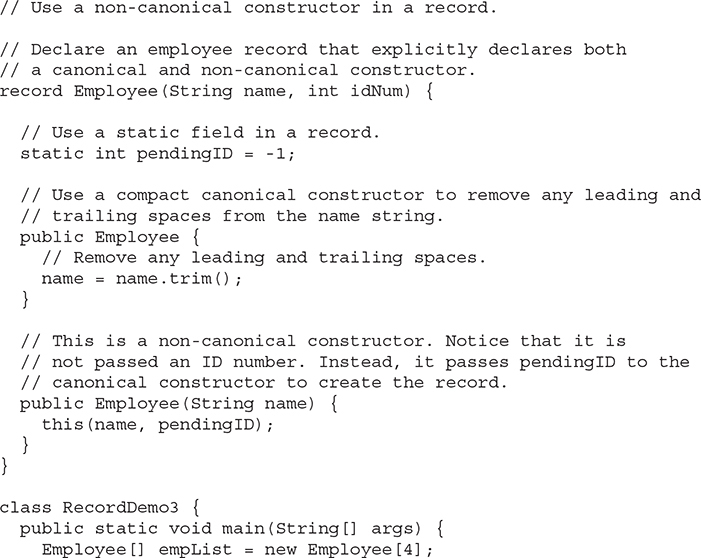
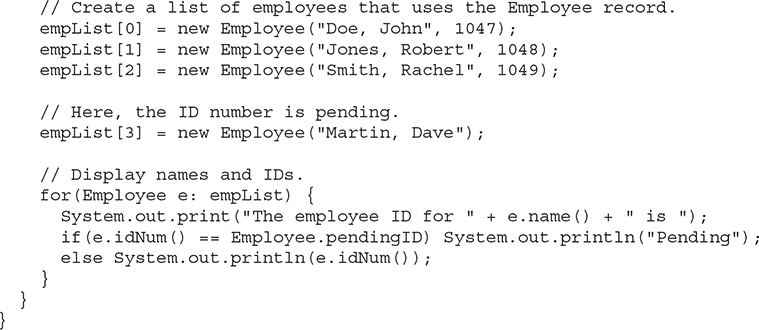
Pay special attention to the way that the record for Martin, Dave is created by use of the non-canonical constructor. That constructor passes the name argument to the canonical constructor, but specifies the value pendingID as the idNum value. This enables a placeholder record to be created without having to specify an ID number. One other point: Notice that the value pendingID is declared as a static field in Employee. As explained earlier, instance fields are not allowed in a record declaration, but a static field is legal.
Notice that this version of Employee declares both a canonical constructor and a non-canonical constructor. This is perfectly valid. A record can define as many different constructors as its needs, as long as all adhere to the rules defined for record.
It is important to emphasize that records are immutable. As it relates to this example, it means that when an ID value for Martin, Dave is obtained, the old record must be replaced by a new record that contains the ID number. It is not possible to alter the record to update the ID. The immutability of records is a primary attribute.
# Another Record Constructor Example
Before leaving the topic of record constructors, we will look at one more example. Because a record is used to aggregate data, a common use of a record constructor is to verify the validity or applicability of an argument. For example, before constructing the record, the constructor may need to determine if a value is out of range, in an improper format, or otherwise unsuitable for use. If an invalid condition is found, the constructor could create a default or error instance. However, often it would be better for the constructor to throw an exception. This way, the user of the record would immediately be aware of the error and could take steps to correct it.
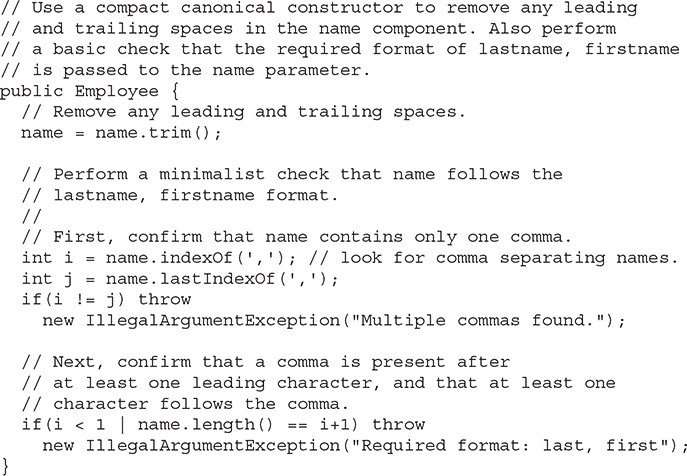
In the preceding Employee record examples, names have been specified using the common convention of lastname, firstname, such as Doe, John. However, there was no mechanism to verify or enforce that this format was being used. The following version of the compact canonical constructor provides a limited check that the name has the format lastname, firstname. It does so by confirming that there is one and only one comma in the name and that there is at least one character (other than space) before and after the comma. Although a far more thorough, careful verification would be needed by a real-world program, this minimal check is sufficient to serve as an example of the validation role a record constructor might play.
Here is a version of the Employee record in which the compact canonical constructor throws an exception if the name component does not meet the minimal criteria required for the lastname, firstname format:
When using this constructor, the following statement is still correct:
empList[0] = new Employee("Doe, John", 1047);
However, the following three are invalid and will result in an exception:

As an aside, you might find it interesting to think of ways that you can improve the ability of the constructor to verify that the name uses the proper format. For example, you might want to explore an approach that uses a regular expression. (See Chapter 31.)
# Create Record Getter Methods
Although it is seldom necessary, it is possible to create your own implementation of a getter method. When you declare the getter, the implicit version is no longer supplied. One possible reason you might want to declare your own getter is to throw an exception if some condition is not met. For example, if a record holds a filename and a URL, the getter for the filename might throw a FileNotFoundException if the file is not present at the URL. There is a very important requirement, however, that applies to creating your getters: they must adhere to the principle that a record is immutable. Thus, a getter that returns an altered value is semantically questionable (and should be avoided) even though such code would be syntactically correct.
If you do declare a getter implementation, there are a number of rules that apply. A getter must have the same return type and name as the component that it obtains. It must also be explicitly declared public. (Thus, default accessibility is not sufficient for a getter declaration in a record.) No throws clause is allowed in a getter declaration. Finally, a getter must be non-generic and non-static.
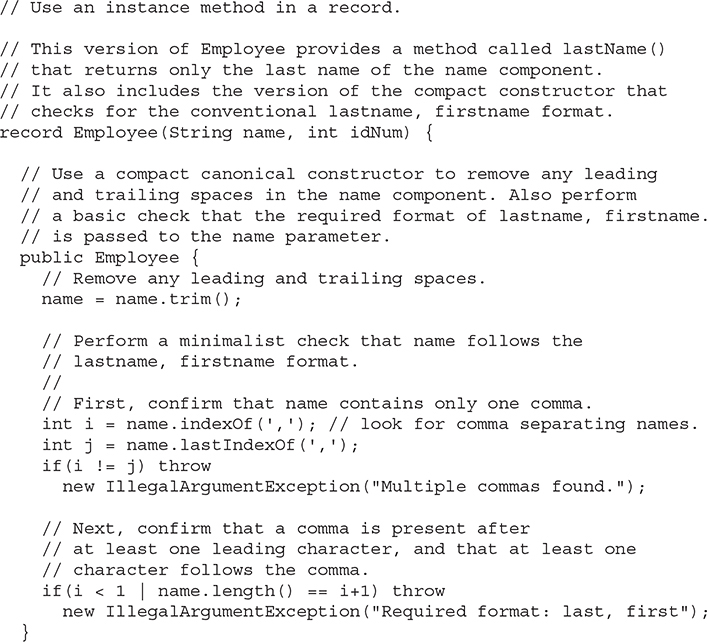
A better alternative to overriding a getter in cases in which you want to obtain a modified value of a component is to declare a separate method with its own name. For example, assuming the Employee record, you might want to obtain only the last name from the name component. Using the standard getter to do this would entail modifying the value obtained from the component. Doing this is a bad idea because it would violate the immutability aspect of the record. However, you could declare another method, called lastName(), that returns only the last name. The following program demonstrates this approach. It also uses the format-checking constructor from the previous section to ensure that names are stored as lastname, firstname.
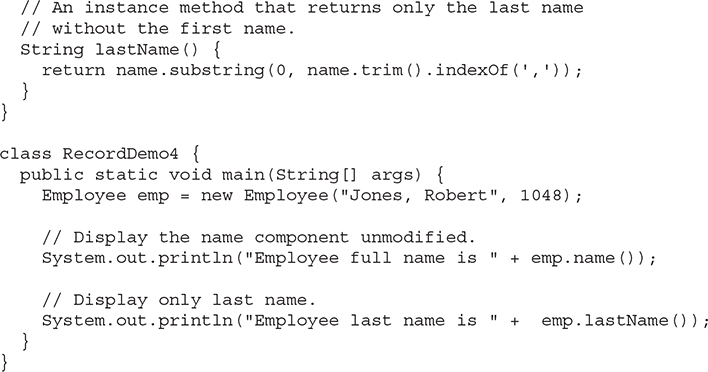
The output is shown here:

As the output shows, the implicit getter for the name component returns the name unaltered. The instance method lastName() obtains only the last name. With this approach, the immutable attribute of the Employee record is preserved, while still providing a convenient means of obtaining the last name.
# Pattern Matching with instanceof
The traditional form of the instanceof operator was introduced in Chapter 13. As explained there, instanceof evaluates to true if an object is of a specified type, or can be cast to that type. Beginning with JDK 16, a second form of the instanceof operator has been added to Java that supports the new pattern matching feature. In general terms, pattern matching defines a mechanism that determines if a value fits a general form. As it relates to instanceof, pattern matching is used to test the type of a value (which must be a reference type) against a specified type. If the pattern matches, a pattern variable will receive a reference to the object matched by the pattern. Beginning with JDK 21 there are two kinds of patterns: type patterns and record patterns. Type patterns are described here. Record patterns are discussed later in this chapter.
The pattern matching form of instanceof is shown here:
objref instanceof type pattern-var
If instanceof succeeds, pattern-var will be created and contain a reference to the object that matches the pattern. If it fails, pattern-var is never created. This form of instanceof succeeds if the object referred to by objref can be cast to type and the static type of objref is not a subtype of type.
For example, the following fragment creates a Number reference called myOb that refers to an Integer object. (Recall that Number is a superclass of all numeric primitive-type wrappers.) It then uses the instanceof operator to confirm that the object referred to by myOb is an Integer, which it will be in this example. This results in an object called iObj of type Integer being instantiated that contains the matched value.

As the comments indicate, iObj is known only within the scope of the if clause. It is not known outside of the if. It also would not be known within an else clause, should one have been included. It is crucial to understand that the pattern variable iObj is created only if the pattern matching succeeds.
The primary advantage of the pattern matching form of instanceof is that it reduces the amount of code that was typically needed by the traditional form of instanceof. For example, consider this functionally equivalent version of the preceding example that uses the traditional approach:

With the traditional form, a separate declaration statement and explicit cast are required to create the iObj variable. The pattern matching form of instanceof streamlines the process.
# Pattern Variables in a Logical AND Expression
An instanceof can be used in a logical AND expression. However, you need to remember that the pattern variable is only in scope after it has been created. For example, the following if succeeds only when myOb refers to an Integer and its value is nonnegative. Pay special attention to the expression in the if:

The iObj pattern variable is created only if the left side of the && (the part that contains the instanceof operator) is true. Notice that iObj is also used by the right side. This is possible because the short-circuit form of the AND logical operator is used, and the right side is evaluated only if the left succeeds. Thus, if the right-side operand is evaluated, iObj will be in scope. However, if you tried to write the preceding statement using the & operator like this:

a compilation error would occur because iObj will not be in scope if the left side fails. Recall that the & operator causes both sides of the expression to be evaluated, but iObj is only in scope if the left side is true. This error is caught by the compiler. A related situation occurs with this fragment:

This fragment compiles because the if block will execute only when both sides of the && are true. Thus, the use of iObj in the if block is valid. However, a compilation error will result if you tried to use the & rather than the &&, as shown here:
if((count < 100) & myOb instanceof Integer iObj) { // Error!
In this case, the compiler cannot know whether or not iObj will be in scope in the if block because the right side of the & will not necessarily be evaluated.
One other point: A logical expression cannot introduce the same pattern variable more than once. For example, in a logical AND, it is an error if both operands create the same pattern variable.
# Pattern Matching in Other Statements
Although a frequent use of the pattern matching form of instanceof is in an if statement, it is by no means limited to that use. It can also be employed in the conditional portion of the loop statements. As an example, imagine that you are processing a collection of objects, perhaps contained in an array. Furthermore, at the start of the array are several strings, and you want to process those strings, but not any of the remaining objects in the list. The following sequence accomplishes this task with a for loop in which the condition uses instanceof to confirm that an object in the array is a String and to obtain that string for processing within the loop. Thus, pattern matching is used to control the execution of a for loop and to obtain the next value for processing.
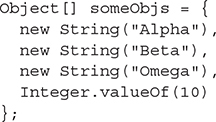

The output from this fragment is shown here:

The pattern matching form of instanceof can also be useful in a while loop. For example, here is the preceding for loop, recoded as a while:

Although it is technically possible to use the pattern matching instanceof in the conditional portion of a do loop, such use is severely limited because the pattern variable cannot be used in body of the loop because it will not be in scope until the instanceof operator is executed.
# Enhancements to switch
The switch statement has been part of Java since the start. It is a crucial element of Java’s program control statements and provides for a multiway branch. Moreover, switch is so fundamental to programming that it is found in one form or another in other popular programming languages. The traditional form of switch was described in Chapter 5. This is the form of switch that has always been part of Java. Beginning with JDK 14, switch has been substantially enhanced with the addition of four new features, and in JDK 21 a fifth, shown here:
The switch expression
The yield statement
Support for a list of case constants
The case with an arrow
Pattern matching in switch
Each new feature is examined in detail in the discussions that follow, but here is a brief description: The switch expression is, essentially, a switch that produces a value. Thus, a switch expression can be used on the right side of an assignment, for example. The yield statement specifies a value that is produced by a switch expression. It is now possible to have more than one case constant in a case statement through the use of a list of constants. A second form of case has been added that uses an arrow (->) instead of a colon. The arrow gives case new capabilities.
Collectively, the enhancements to switch represent a fairly significant change to the Java language. Not only do they provide new capabilities, but in some situations, they also offer superior alternatives to traditional approaches. Because of this, a solid understanding of the “how” and “why” behind the new switch features is important.
One of the best ways to understand the switch enhancements is to start with an example that uses a traditional switch and then gradually incorporate each new feature. This way, the use and benefit of the enhancements will be clearly apparent. To begin, imagine some device that produces integer codes that indicate various events, and you want to associate a priority level with each event code. Most events will have a normal priority, but a few will have a higher priority. Here is a program that uses a traditional switch statement to supply a priority level given an event code:
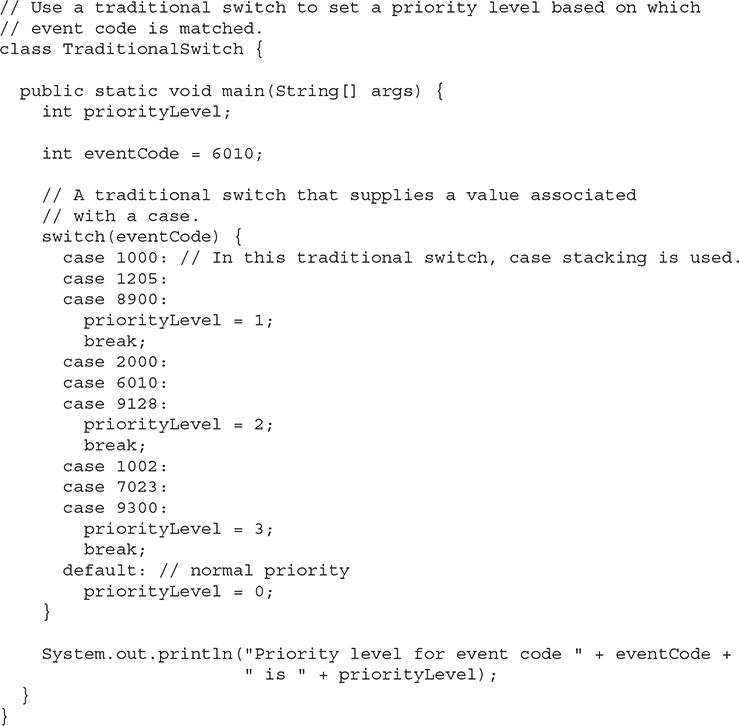
The output is shown here:
Priority level for event code 6010 is 2
There is certainly nothing wrong with using a traditional switch as shown in the program, and this is the way Java code has been written for more than two decades. However, as the following sections will show, in many cases, the traditional switch can be improved by use of the enhanced switch features.
# Use a List of case Constants
We begin with one of the easiest ways to modernize a traditional switch: by use of a list of case constants. In the past, when two constants were both handled by the same code sequence, case stacking was employed, and this is the approach used by the preceding program. For example, here are how the cases for 1000, 1205, and 8900 are handled:

The stacking of case statements enables all three case statements to use the same code sequence to set priorityLevel to 1. As explained in Chapter 5, in a traditional-style switch, the stacking of cases is made possible because execution falls through each case until a break is encountered. Although this approach works, a more elegant solution can be achieved by use of a case constant list.
Beginning with JDK 14, you can specify more than one case constant in a single case. To do so, simply separate each constant with a comma. For example, here is a more compact way to code the case for 1000, 1205, and 8900:

Here is the entire switch, rewritten to use lists of case constants:
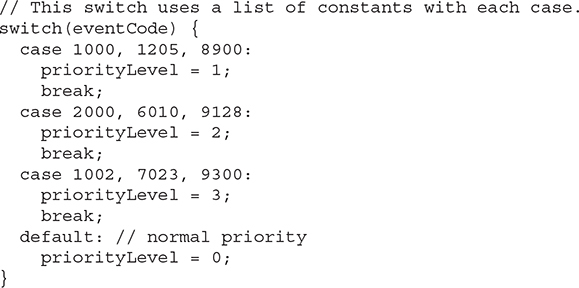
As you can see, the number of case statements has been reduced by six, making the switch easier to read and a bit more manageable. Although support for a case constant list does not by itself add any fundamentally new functionality to the switch, it does help streamline your code. In many situations, it also offers an easy way to improve existing code—especially when extensive case-stacking was previously employed. Thus, it is a feature that you can put to work immediately, with minimal code rewriting.
# Introducing the switch Expression and the yield Statement
Of the enhancements to switch, the one that will have the most profound impact is the switch expression. A switch expression is, essentially, a switch that returns a value. Thus, it has all of the capabilities of a traditional switch statement, plus the ability to produce a result. This added capability makes the switch expression one of the more important additions to Java in recent years.
One way to supply the value of a switch expression is with the new yield statement. It has this general form:
yield value;
Here, value is the value produced by the switch, and it can be any expression compatible with the type of value required. A key point to understand about yield is that it immediately terminates the switch. Thus, it works somewhat like break, with the added capability of supplying a value. It is important to point out that yield is a context-sensitive keyword. This means that outside its use in a switch expression, yield is simply an identifier with no special meaning. However, if you use a method called yield(), it must be qualified. For example, if yield() is a non-static method within its class, you must use this.yield().
It is very easy to specify a switch expression. Simply use the switch in a context in which a value is required, such as on the right side of an assignment statement, an argument to a method, or a return value. For example, this line indicates that a switch expression is being employed:
int x = switch(y) { // ...
Here, the switch result is being assigned to the x variable. A key point about using a switch expression is that each case (plus default) must produce a value (unless it throws an exception). In other words, each path through a switch expression must produce a result.
The addition of the switch expression simplifies the coding of situations in which each case sets the value of some variable. Such situations can occur in a number of different ways. For example, each case might set a boolean variable that indicates the success or failure of some action taken by the switch. Often, however, setting a variable is the primary purpose of the switch, as is the case with the switch used by the preceding program. Its job is to produce the priority level associated with an event code. With a traditional switch statement, each case statement must individually assign a value to the variable, and this variable becomes the de facto result of the switch. This is the approach used by the preceding programs, in which the value of the variable priorityLevel is set by each case. Although this approach has been used in Java programs for decades, the switch expression offers a better solution because the desired value is produced by the switch itself.
The following version of the program puts the preceding discussion into action by changing the switch statement into a switch expression:
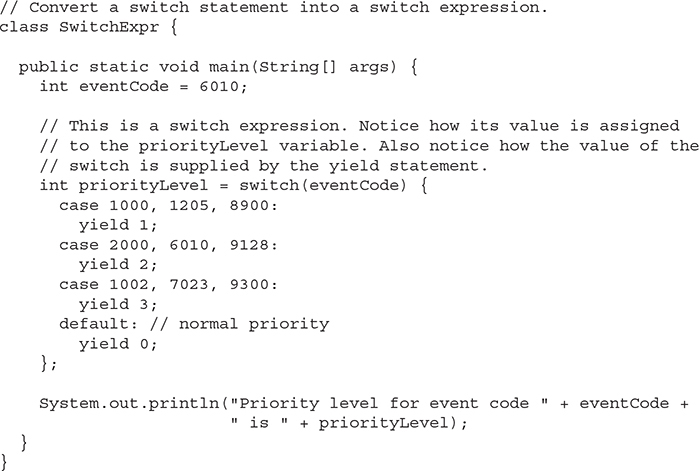
Look closely at the switch in the program. Notice that it differs in important ways from the one used in the previous examples. Instead of each case assigning a value to priorityLevel individually, this version assigns the outcome of the switch itself to the priorityLevel variable. Thus, only one assignment to priorityLevel is required, and the length of the switch is reduced. Using a switch expression also ensures that each case yields a value, thus avoiding the possibility of forgetting to give priorityLevel a value in one of the cases. Notice that the value of the switch is produced by the yield statement inside each case. As explained, yield causes immediate termination of the switch, so no fall-through from case to case will occur. Thus, no break statement is required, or allowed. One other thing to notice is the semicolon after the closing brace of the switch. Because this switch is used in an assignment, it must be terminated by a semicolon.
There is an important restriction that applies to a switch expression: the case statements must handle all of the values that might occur. Thus, a switch expression must be exhaustive. For example, if its controlling expression is of type int, then all int values must be handled by the switch. This would, of course, constitute a very large number of case statements! For this reason, most switch expressions will have a default statement. The exception to this rule is when an enumeration is used, and each value of the enumeration is matched by a case.
# Introducing the Arrow in a case Statement
Although the use of yield in the preceding program is a perfectly valid way to specify a value for a switch expression, it is not the only way to do so. In many situations, an easier way to supply a value is through the use of a new form of the case that substitutes -> for the colon in a case. For example, this line:
case 'X': // ...
can be rewritten using the arrow like this:
case 'X' -> // ...
To avoid confusion, in this discussion we will refer to a case with an arrow as an arrow case and the traditional, colon-based form as a colon case. Although both forms will match the character X, the precise action of each style of case statement differs in three very important ways.
First, one arrow case does not fall through to the next case. Thus, there is no need to use break. Execution simply terminates at the end of an arrow case. Although the fall-through nature of a traditional colon-based case has always been part of Java, fall-through has been criticized because it can be a source for bugs, such as when the programmer forgets to add a break statement to prevent fall-through when fall-through is not desired. The arrow case avoids this situation. Second, the arrow case provides a “shorthand” way to supply a value when used in a switch expression. For this reason, the arrow case is often used in switch expressions. Third, the target of an arrow case must be either an expression, a block, or throw an exception. It cannot be a statement sequence, as is allowed with a traditional case. Thus, the arrow case will have one of these general forms:

Of course, the first two forms represent the primary uses.
Arguably, the most common use of an arrow case is in a switch expression, and the most common target of the arrow case is an expression. Thus, it is here that we will begin. When the target of an arrow case is an expression, the value of that expression becomes the value of the switch expression when that case is matched. Thus, it provides a very efficient alternative to the yield statement in many situations. For example, here is the first case in the event code example rewritten to use an arrow case:
case 1000, 1205, 8900 -> 1;
Here, the value of the expression (which is 1) automatically becomes the value produced by the switch when this case is matched. In other words, the expression becomes the value yielded by the switch. Notice that this statement is quite compact, yet clearly expresses the intent to supply a value.
In the following program, the entire switch expression has been completely rewritten to use the arrow case:

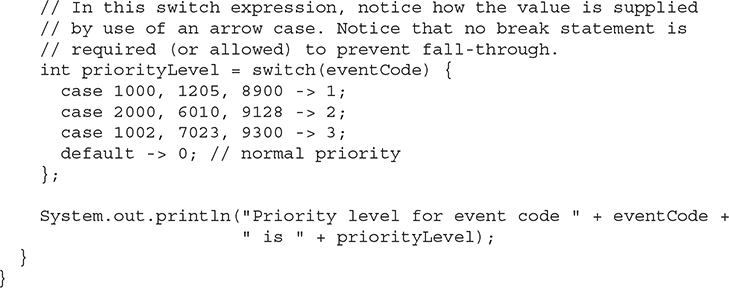
This produces the same output as before. Looking at the code, it is easy to see why this form of the arrow case is so appropriate for many types of switch expressions. It is compact and eliminates the need for a separate yield statement. Because the arrow case does not fall through, there is no need for a break statement. Each case terminates by yielding the value of its expression. Furthermore, if you compare this final version of the switch to the original, traditional switch shown at the start of this discussion, it is readily apparent how streamlined and expressive this version is. In combination, the switch enhancements offer a truly impressive way to improve the clarity and resiliency of your code.
# A Closer Look at the Arrow case
The arrow case provides considerable flexibility. First, when using its expression form, the expression can be of any type. For example, the following is a valid case statement:
case -1 –> getErrorCode();
Here, the result of the call to getErrorCode() becomes the value of the enclosing switch expression. Here is another example:
case 0 -> normalCompletion = true;
In this case, the result of the assignment, which is true, becomes the value yielded. The key point is that any valid expression can be used as the target of the arrow case as long as it is compatible with the type required by the switch.
As mentioned, the target of the -> can also be a block of code. You will need to use a block as the target of an arrow case whenever you need more than a single expression. For example, each case in this version of the event code program sets the value of a boolean variable called stopNow to indicate if immediate termination is required and then yields the priority level:

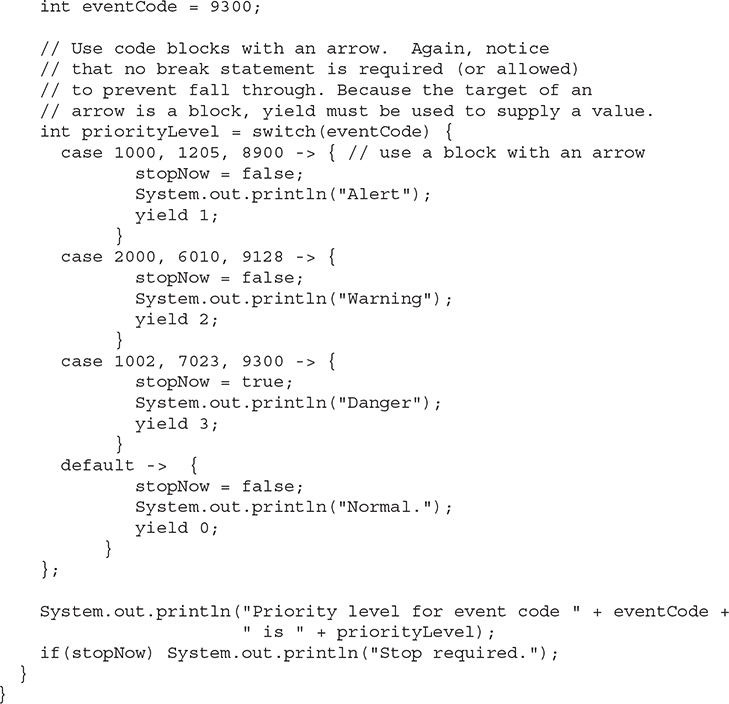
Here is the output:

As this example shows, when using a block, you must use yield to supply a value to a switch expression. Furthermore, even though block targets are used, each path through the switch expression must still provide a value.
Although the preceding program provides a simple illustration of a block target of an arrow case, it also raises an interesting question. Notice that each case in the switch sets the value of two variables. The first is priorityLevel, which is the value yielded. The second is stopNow. Is there a way for a switch expression to yield more than one value? In a direct sense, the answer is “no” because only one value can be produced by the switch. However, it is possible to encapsulate two or more values within a class and yield an object of that class. Beginning with JDK 16, Java provides an especially streamlined and efficient way to accomplish this: the record. Described later in this chapter, a record aggregates two or more values into a single logical unit. As it relates to this example, a record could hold both the priorityLevel and the stopNow values, and this record could be yielded by the switch as a unit. Thus, a record offers a convenient way for a switch to yield more than a single value.
Although the arrow case is very helpful in a switch expression, it is important to emphasize that it is not limited to that use. The arrow case can also be used in a switch statement, which enables you to write switches in which no case fall-through can occur. In this situation, no yield statement is required (or allowed), and no value is produced by the switch. In essence, it works much like a traditional switch but without the fall-through. Here is an example:
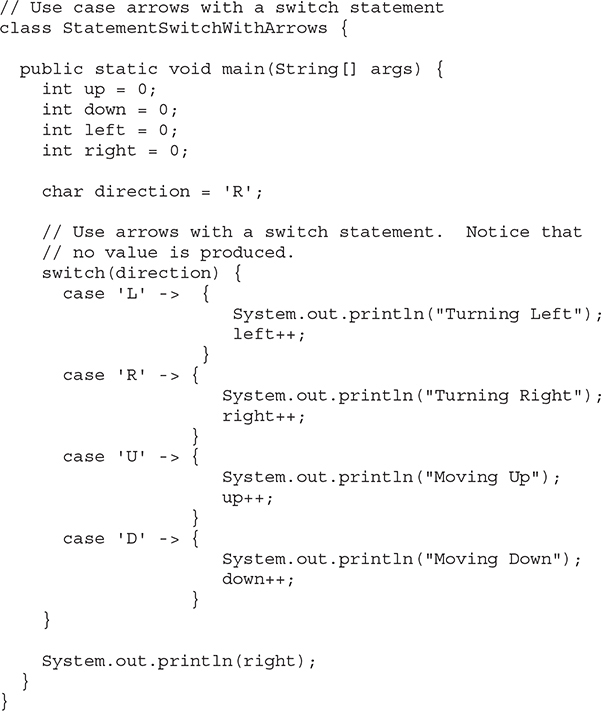
In this program, the switch is a statement, not an expression. This is because of two reasons. First, no value is produced. Second, it is not exhaustive because no default statement is included. (Recall that switch expressions must be exhaustive, but not switch statements.) Notice, however, that because no fall-through occurs with an arrow case, no break statement is needed. As a point of interest, because each case increases the value of a different variable, it would not be possible to transform this switch into an expression. What value would it produce? All four cases increment a different variable.
One last point: you cannot mix arrow cases with traditional colon cases in the same switch. You must choose one or the other. For example, this sequence is invalid:
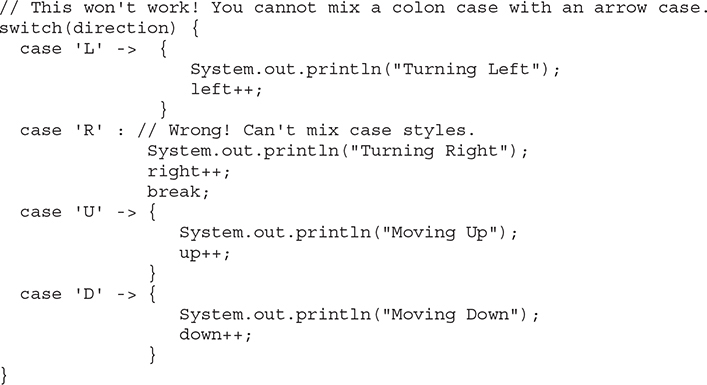
# Another switch Expression Example
To continue this overview of the switch enhancements, another example is presented. It uses a switch expression to determine whether a letter is an English-language vowel. It makes use of all of the new switch features. Pay special attention to the way Y is handled. In English, Y can be a vowel or a consonant. The program lets you specify which way you want the Y interpreted by the way the yIsVowel variable is set. To handle this special case, a block is used as the target of the ->.
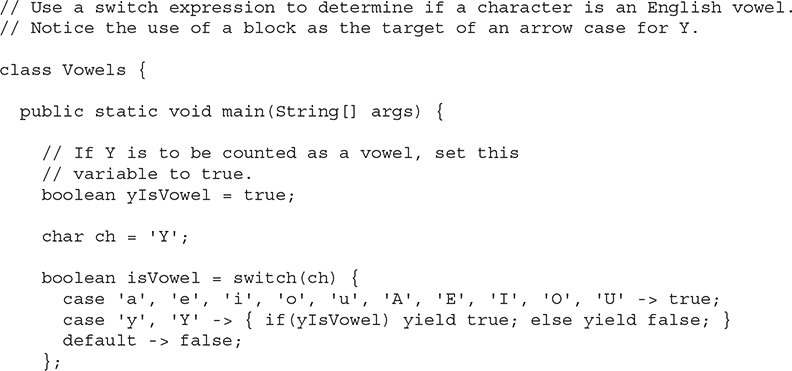

As an experiment, try rewriting this program using a traditional switch. As you will find, doing so results in a much longer, less manageable version. The new switch enhancements often provide a superior approach.
# Pattern Matching in switch
JDK 21 introduces a convenient way to use pattern matching with switch, and it’s the last of the enhancements to switch. It follows a similar syntax of pattern matching that you saw earlier in the context of the instanceof keyword, but within switch statements.
By now you are familiar with the power of switch statements to simplify code that chooses to perform different functions based on different values of a variable, but what about when the variable can be of a number of different types, enums, null values, and even ranges of values?
Take a look at the following code, which prints a message based on an object that identifies an employee of some kind at a company. The object can come in many shapes and sizes: it can be a Java record representing an employee with name and ID, an implementation of an interface called Employee, a particular implementation of that interface, a Java enum representing the chief executive and chief financial officers of a company, an integer, a string, or something else entirely. Depending on its nature, you want the code to handle the object representing an employee differently. You might naturally think of using instanceof checks in a chain of if-else statements to separate out all the different cases. If you did, you would end up with something that looks like this:
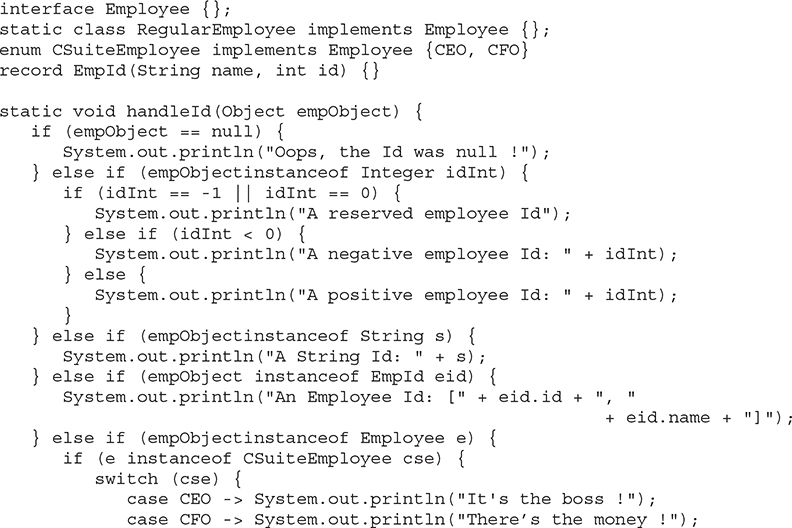

In this example, you can see that the message the code formulates to print out depends upon the type of the employee object. You can also see in the case when the id is an Integer, the message printed is different for numerical values that are exactly equal to -1 or 0, or are negative or positive. The logic of this code to sift through all the possible types of employee is buried in the structure of the if-else statements, making it quite difficult to see how the different types and values are treated without deep study. Fortunately, by using pattern matching in switch statements, you can simplify this code by using the four new features of switch, described as follows.
You can use null in a case statement.
Before JDK 21, if you passed a null value into a switch statement, it would throw a NullPointerException at run time. This meant that you would need to have an explicit null check somewhere before your switch statement. But the new enhanced switch statements can have a case statement to deal with null values in the switch variable, like this:
case null -> // handle null value here
Note that if you don’t provide a case statement to handle a null case, the switch statement still throws a NullPointerException in the case of a null value, just as before JDK 21.
You can use pattern matching within case statements.
This second expansion of the power of the case statement allows you to concisely check that the switch variable is of a given type and also assign a variable to it that you can use for processing this case. For example:
case String s -> System.out.println("It's a String with value: " + s);
You can refine the case statement to deal with specific values.
This is an important addition to the use of the contextual keyword when to the syntax because it allows you to express a case label that is conditional on the value of an object reference instead of the fixed values of a literal. For example, you can express a case label for a String value that only applies if the String has a certain form:

You can use Java records and more easily use enum constants in switch statements.
Prior to JDK 21 you could only use enum constants in switch statements where the switch variable was that enum type. This limitation has been relaxed in JDK 21 to allow you to use enum constants in case statements when the switch variable is a more general type. You can also use a Java record in a case statement and in pattern matching form.
Let’s combine all four of these new features to simplify the code you started out with and make it much more concise and readable:
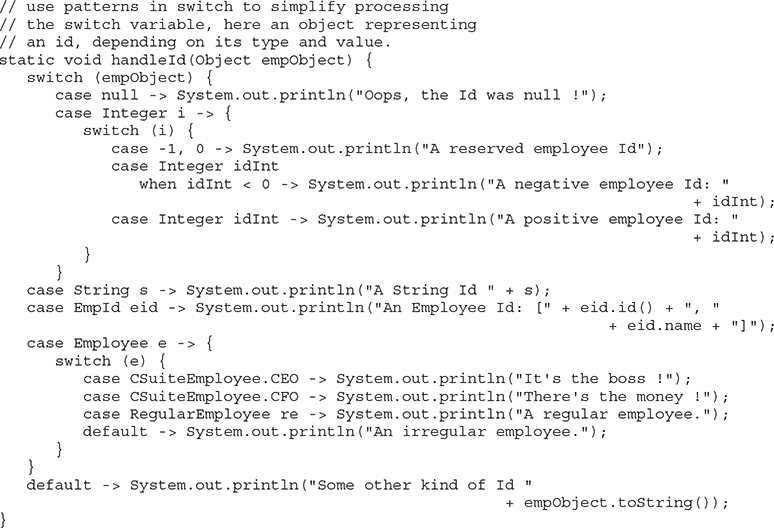
Something may have occurred to you as you look at this code: since the switch variable can be any reference type, you can write many case statements that might be true for a given value of switch variable. In our example, we have a switch statement testing the kind of Employee object passed in. If you had two case statements, one pattern matching on the general Employee type
ncase Employee e -> …
and one on the RegularEmployee type
ncase RegularEmployee re -> …
and you passed in an object of type RegularEmployee, you might notice that both case statements would match. But, if so, in the context of your switch statement, which case would “win”? Only one case statement can be executed! To understand how which one is determined, you need to understand the concept of case label dominance.
One case label is said to dominate a second if it includes all the possible situations where the second applies and more. So, in our example, the case Employee e label dominates the case RegularEmployee re case label, because all RegularEmployee objects are also Employee objects, since the RegularEmployee class implements the Employee interface.
Now, Java uses a very simple approach to determine which one of possibly many case labels to select for a given value: it simply chooses the first case label in the order they are written that matches the switch variable. You need to understand case label dominance because this approach can potentially lead to cases where code could never be reached when one case label that dominates another appears before it in the switch statement. In fact, this situation will be interpreted by Java as a compilation error.
In our example earlier, in processing employee IDs that we know to be integers represented by the variable i, if you reversed the order of the case statements,

you would see that the first case label Integer idInt dominates the rest of the case labels that follow. All values of the Integer i would match the first case label, and the other case labels would never be reached in any circumstance. The code will not compile.
So when you write this kind of pattern matching switch statement, it is important to remember to put the least dominant case labels first. Case labels for a given type that use the contextual keyword when to refine the matching values are dominated by those that don’t. In our example, case Integer idInt dominates case Integer idInt when idInt < 0 because the first applies to all Integer values, including all the negative ones. case labels using a pattern for a given type dominate case labels using a constant expression for that type. In our example code, the case -1, 0 label is dominated by the other two case labels. In general, provided you remember to put the most specific case labels first in order, you should end up with code that compiles without errors.
With this final collection of features that have been added to switch expressions and statements, you can see now just how powerful they have become, particularly for concisely handling objects that may come in many shapes and forms.
# Text Blocks
Beginning with JDK 15, Java provides support for text blocks. A text block is a new kind of literal that is comprised of a sequence of characters that can occupy more than one line. A text block reduces the tedium programmers often face when creating long string literals because newline characters can be used in a text block without the need for the \n escape sequence. Furthermore, tab and double quote characters can also be entered directly, without using an escape sequence, and the indentation of a multiline string can be preserved. Although text blocks may, at first, seem to be a relatively small addition to Java, they may well become one of the most popular features.
# Text Block Fundamentals
A text block is supported by a new delimiter, which is three double-quote characters: """. A text block is created by enclosing a string within a set of these delimiters. Specifically, a text block begins immediately following the newline after the opening """. Thus, the line containing the opening delimiter must end with a newline. The text block begins on the next line. A text block ends at the first character of the closing """. Here is a simple example:

This example creates a string in which the line "Text blocks make" is separated from "multiple lines easy." by a newline. It is not necessary to use the \n escape sequence to obtain the newline. Thus, the text block automatically preserves the newlines in the text. Again, the text block begins after the newline following the opening delimiter and ends at the start of the closing delimiter. Therefore, the newline after the second line is also preserved.
It is important to emphasize that even though a text block uses the """ delimiter, it is of type String. Thus, the preceding text block could be assigned to a String variable, as shown here:

When str is output using this statement:
System.out.println(str);
the following is displayed:

Notice something else about this example. Because the last line ends with a newline, that newline will also be in the resulting string. If you don’t want a trailing newline, then put the closing delimiter at the end of the last line, like this:

# Understanding Leading Whitespace
In the preceding example, the text in the block was placed flush left. However, this is not required. You can have leading whitespace in a text block. There are two primary reasons that you might want leading whitespace. First, it will enable the text to be better aligned with the indentation level of the code around it. Second, it supports one or more levels of indentation within the text block itself.
In general, leading whitespace in a text block is automatically removed. However, the number of leading whitespaces to remove from each line is determined by the number of leading whitespaces in the line with the least indentation. For example, if all lines are flush left, then no whitespace is removed. If all lines are indented two spaces, then two spaces are removed from each line. However, if one line is indented two spaces, the next four spaces, and the third six spaces, then only two spaces are removed from the start of each line. This removes unwanted leading space while preserving the indentation of text within the block. This mechanism is illustrated by the following program:
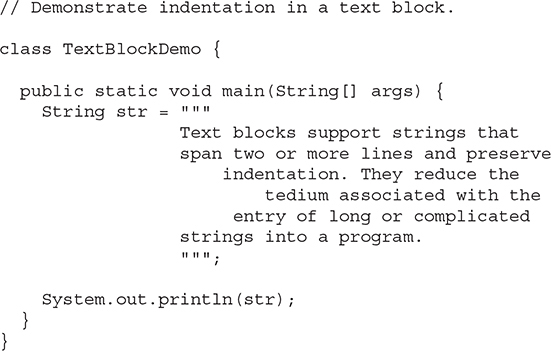
This program produces the following output:

As you can see, leading whitespace has been removed up to, but not beyond, the level of the leftmost lines. Thus, the text block can be indented in the program to better fit the indentation level of the code, with the leading whitespace removed when the string is created. However, any whitespace after the indentation level of the block is preserved.
One other key point: The closing """ participates in determining the amount of whitespace to remove because it, too, can set the indentation level. Thus, if the closing delimiter is flush left, no whitespace is removed. Otherwise, whitespace is removed up to the first text character or when the closing delimiter is encountered. For example, consider this sequence:

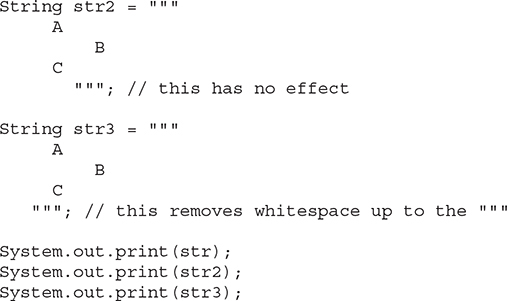
This sequence displays the following:

Pay special attention to the placement of the closing delimiter for str2. Because the number of preceding spaces for the lines containing A and C are fewer than that preceding the """, the closing delimiter has no effect on the number of spaces removed.
# Use Double Quotes in a Text Block
Another major advantage to text blocks is the ability to use double quotes without the need for the \" escape sequence. In a text block, double quotes are treated like any other character. For example, consider the following program:
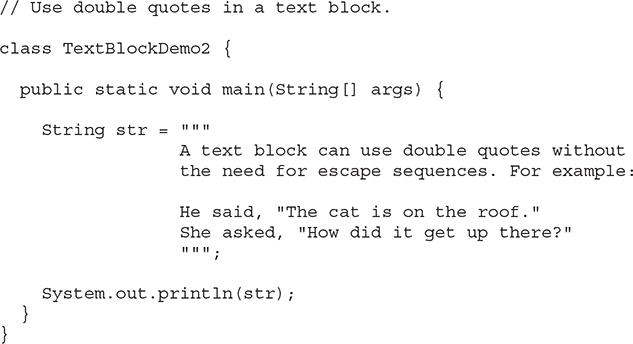
The output is shown here:

As you can see, there was no need to use the \" escape sequence. Furthermore, because double quotes are treated as “normal” characters, there is also no need for them to be balanced within a text block. For example

is perfectly acceptable. Just remember that three double quotes as a unit defines the text block delimiter.
# Escape Sequences in Text Blocks
The escape sequences, such as \n or \t, can be used in a text block. However, because double quotes, newlines, and tabs can be entered directly, they will not often be needed. That said, with the addition of text blocks, two new escape sequences were added to Java. The first is \s, which specifies a space. Thus, it can be used to indicate trailing spaces. The second is \endofline. Because the \ must be followed by a line terminator, it must be used only at the end of the line. In a text block, the \ prevents a newline character from being included at the end of its line. Thus, the \ is essentially a line continuation indicator. For example:
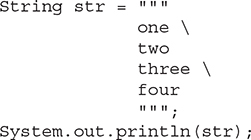
Because the newline is suppressed after one and three, the output will be as shown here:

It is important to point out that \endofline can only be used in a text block. It cannot be used to continue a traditional string literal, for example.
One final point before leaving the topic of text blocks: Because text blocks provide a better, easier way to enter many types of strings into your program, it is anticipated that they will be widely used by the Java programmer community. It is likely that you will begin to encounter them in code that you work on, or use them in code that you create. Just remember, your JDK release must be at least 15 or later.
# Pattern Matching with Records
JDK 21 introduces a convenient way to use pattern matching with records, called record patterns. Given that a record defines the structure of its member variables, or components, this feature simplifies the instanceof-then-cast idiom, tailored specifically to records. With record patterns, you can pass a record pattern as an operand of the instanceof operator, where a record pattern is of the general form
recordName(component-list)
and, most importantly, should the instanceof expression match, all the record components become available as local variables. Specifically, the record pattern form of instanceof is
objref instanceof recordName(component-list)
If the record pattern matches, each record component variable in the list will be automatically assigned the value of the corresponding record component from the matched objref object.
Let’s work through an example to see firsthand the benefits record patterns can bring to your code. Let’s return to processing objects representing employees at a company using a Java record to encode their data.

This time you can see that there is some additional structure to represent different kinds of employees: full or part time. We can use record patterns to make it easy to process this kind of object in code. Now, assume you want to write some code to check if an object passed to you is an instance of this Employee record and, if it is, you will want to access some of its data, or record components. Prior to the advent of record patterns, you would use an instanceof expression with a type pattern and access the record data in the conditional block using its accessor methods. You can see this approach here:

While it’s clear what this code is doing, it also shows that the variable employee is simply being used as a holder to get at what you really are interested in from this record, which are its name and id components. With the record patterns feature, you can change the operand of instanceof to be a record pattern. In the event that the value is indeed a record of the type you specify, the record object is assigned to the variable you provide, and all its components become locally scoped variables that you can access. This holds true when the record components are simple types such as String or Integer and also for any class type or record whose nested structure matches the operand.
Here is a fuller listing using a record pattern to simplify the processing of the object passed to your code that may or may not be the Employee object you want:
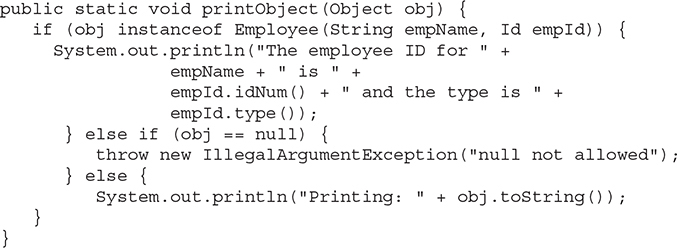
Notice that the component names in the record pattern, empName and empId, do not need to match names in the declaration of the record, name and id, in order for an Employee object to match the record pattern. This means you are free to name the components to suit the context of the code you are writing. An object that is null will never match a record pattern, even if its variable declaration is of the correct type. In this example, the null case is handled explicitly. You can see in the example that when the obj variable is indeed an Employee object, you don’t have to use a variable for the Employee object; you can directly use its name and id components.
In fact, we can apply this pattern once more in our example because record patterns can nest inside each other. You’ll notice in our example that while we got rid of the useless variable for the Employee, we still have the empId variable for the Id record, which is used only to get at the idNum and type values it holds. So, let’s decompose this further with another record pattern for the Id record as well:
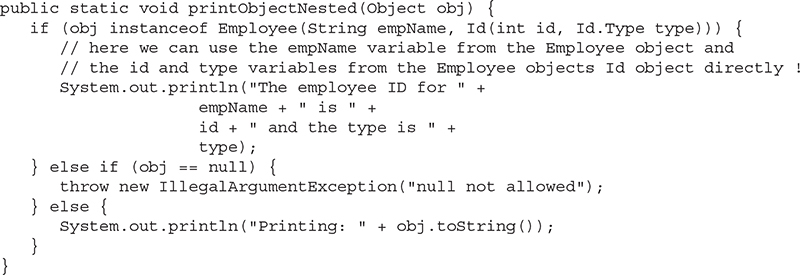
Just as records are simply carriers for the data they hold, record patterns are an attractive way to simplify code so that it gets straight to the point of a record: its data.
# Sealed Classes and Interfaces
Beginning with JDK 17, it is possible to declare a class that can be inherited by only specific subclasses. Such a class is called sealed. Prior to the advent of sealed classes, inheritance was an “all or nothing” situation. A class could either be extended by any subclass or marked as final, which prevented its inheritance entirely. Sealed classes fall between these two extremes because they enable you to specify precisely what subclasses a superclass will allow. In similar fashion, it is also possible to declare a sealed interface in which you specify only those classes that implement the interface and/or those interfaces that extend the sealed interface. Together, sealed classes and interfaces give you significantly greater control over inheritance, which can be especially important when designing class libraries.
# Sealed Classes
To declare a sealed class, precede the declaration with sealed. Then, after the class name, include a permits clause that specifies the allowed subclasses. Both sealed and permits are context-sensitive keywords that have special meaning only in a class or interface declaration. Outside of a class or interface declaration, sealed and permits are unrestricted and have no special meaning. Here is a simple example of a sealed class:

Here, the sealed class is called MySealedClass. It allows only two subclasses: Alpha and Beta. If any other class attempts to inherit MySealedClass, a compile-time error will occur.
Here are Alpha and Beta, the two subclasses of MySealedClass:

Notice that each is specified as final. In general, a subclass of a sealed class must be declared as either final, sealed, or non-sealed. Let’s look at each option. First, in this example, each subclass is declared final. This means that the only subclasses of MySealedClass are Alpha and Beta, and no subclasses of either of those can be created. Therefore, the inheritance chain ends with Alpha and Beta.
To indicate that a subclass is itself sealed, it must be declared sealed and its permitted subclasses must be specified. For example, this version of Alpha permits Gamma:

Of course, the class Gamma must then itself be declared either sealed, final, or non-sealed.
At first it might seem a bit surprising, but you can unseal a subclass of a sealed class by declaring it non-sealed. This context-sensitive keyword was added by JDK 17. It unlocks the subclass, enabling it to be inherited by any other class. For example, Beta could be coded like this:

Now, any class may inherit Beta. However, the only direct subclasses of MySealedClass remain Alpha and Beta. A primary reason for non-sealed is to enable a superclass to specify a limited set of direct subclasses that provide a baseline of well-defined functionality but allow those subclasses to be freely extended.
If a class is specified in a permits clause for a sealed class, then that class must directly extend the sealed class. Otherwise, a compile-time error will result. Thus, a sealed class and its subclasses define a mutually dependent logical unit. Additionally, it is illegal to declare a class that does not extend a sealed class as non-sealed.
A key requirement of a sealed class is that every subclass that it permits must be accessible. Furthermore, if a sealed class is contained in a named module, then each subclass must also be in the same named module. In this case, a subclass can be in a different package from the sealed class. If the sealed class is in the unnamed module, then the sealed class and all permitted subclasses must be in the same package.
In the preceding discussion, the superclass MySealedClass and its subclasses Alpha and Beta would have been stored in separate files because they are all public classes. However, it is also possible for a sealed class and its subclasses to be stored in a single file (formally, a compilation unit) as long as the subclasses have default package access. In cases such as this, no permits clause is required for a sealed class. For example, here all three classes are in the same file:
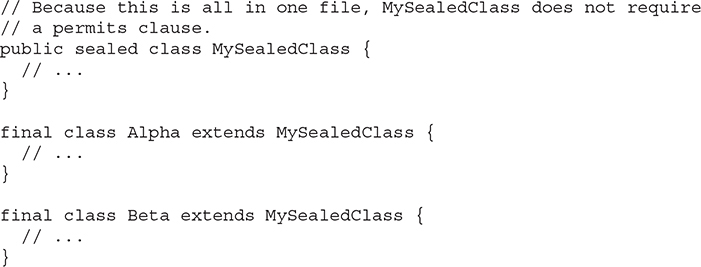
One last point: An abstract class can also be sealed. There is no restriction in this regard.
# Sealed Interfaces
A sealed interface is declared in the same way as a sealed class, by the use of sealed. A sealed interface uses its permits clause to specify the classes allowed to implement it and/or the interfaces allowed to extend it. Thus, a class that is not part of the permits clause cannot implement a sealed interface, and an interface not included in the permits clause cannot extend it.
Here is a simple example of a sealed interface that permits only the classes Alpha and Beta to implement it:

A class that implements a sealed interface must itself be specified as either final, sealed, or non-sealed. For example, here Alpha is marked non-sealed and Beta is specified as final:

Here is a key point: Any class specified in a sealed interface’s permits clause must implement the interface. Thus, a sealed interface and its implementing classes form a logical unit.
A sealed interface can also specify which other interfaces can extend the sealed interface. For example, here, MySealedIF specifies that MyIF is permitted to extend it:

Because MyIF is part of the MySealedIF permits clause, it must be marked as either non-sealed or sealed and it must extend MySealedIF. For example:

As you might expect, it is possible for a class to inherit a sealed class and implement a sealed interface. For example, here Alpha inherits MySealedClass and implements MySealedIF:

In the preceding examples, each class and interface are declared public. Thus, each is in its own file. However, as is the case with sealed classes, it is also possible for a sealed interface and its implementing classes (and extending interfaces) to be stored in a single file as long as the classes and interfaces have default package access. In cases such as this, no permits clause is required for a sealed interface. For example, here MySealedIF does not include a permits clause because Alpha and Beta are declared in the same file in the unnamed module:


One final point: Sealed classes and interfaces are most applicable to developers of API libraries in which subclasses and subinterfaces must be strictly controlled.
# Future Directions
As discussed in Chapter 1, beginning with JDK 12, Java releases may, and often do, include preview features. A preview feature is a new, fully developed enhancement to Java. However, a preview feature is not yet formally part of Java. Instead, a feature is previewed to allow programmers time to experiment with the feature and, if desired, communicate their thoughts and opinions prior to the feature being made permanent. This process enables a new feature to be improved or optimized based on actual developer use. As a result, a preview feature is subject to change. It can even be withdrawn. This means that a preview feature should not be used for code that you intend to publicly release That said, it is expected that most preview features will ultimately become part of Java, possibly after a period of refinement. Preview features chart the course of Java’s future direction.
For example, the new pattern matching in switch and record pattern language features were first introduced in preview form in JDK 17 and JDK 19, respectively. They evolved in subsequent releases based on developer feedback, until they have reached their finalized forms, as described earlier in this chapter, in JDK 21. JDK 21 previews additional enhancements to the Java language, such as String Templates (JEP 430) and Unnamed Patterns and Variables (JEP 443), giving an indication of what may turn into finalized language features in a future release of the JDK. Because these are preview features that are subject to change, they are not discussed further in this book.
Java releases may also include incubator modules, which preview a new API or tool that is undergoing development. Like a preview feature, an incubator feature is subject to change. Furthermore, an incubator feature can be removed in the future. Thus, there is no guarantee that an incubator module will formally become part of Java in the future. Incubator features give developers an opportunity to experiment with the API or tool, and possibly supply feedback. JDK 21 includes one incubator module, the Vector API (JEP 448).
It is important to emphasize that preview features and incubator modules can be introduced in any Java release. Therefore, you will want to watch for them in each new version of Java. They give you a chance to try a new enhancement before it potentially becomes a formal part of Java. Perhaps more importantly, preview features and incubator modules give you advance information on where Java’s development is headed.